Hi all. I'm new here and new to surfing full stop. Ive only tried it once in my life almost 20 years ago!!
Recently, and with thanks to this very forum, I came into possession of a 10'6 longboard that my grandfather John Saffron from Geelong, Vic which was made back in the late 50's to early 60's. It's had a colourful life outside of it's intended purpose of being ridden in water. Apparently it was destined for the tip, saved and handed to a member of this forum. It had been shot at, used as a table and god knows what else ;)
In the original owner's post, he asked if it was a balsa unit or not. It appears to be foam yet speaking to my mother (John's daughter) he made Balsas from his beginning in the mid to late 50's then moved on to foam. Either way, I am so happy to have this board back in the family but I would like to seek your collective advice on what to do with it.
It seems it may be beyond repair by simple patch work so what do I do with it?
a) Patch the holes only and leave as is as an heirloom
b) Cut the delaminated bits out and reglass them
c) Strip all the glass off, repair the foam and reglass completely.
Ideally I would like to keep it as original as possible but I would also like to be able to ride it (at least learn to).
Finally, having come into possession of this board has enlightened me to the surfing world as it were and I've decided to have a crack at making my own longboard. Ive started work on a 9'2" board which I intend to make from paulownia/cedar. I will try to have as little graphic/art on it as possible to keep the woodwork visible. I will call this the "GeeLongBoard" ;)
Anyhoo, enough rambling. Id love to hear your thoughts. Cheers,
Brett


G'day mister...
Me personally, I would get it water tight and flush as possible without adding a tonne of resin and matting to it. This will be controversial to some, but given the state of the board I would be looking to repaint it - but keeping the same colour schemes... to my mind the board is 95% original shape and construction - you have only changed the colours and by replicating the original design and colour scheme you have been faithful to the original designer.
I am restoring a 1968 board at the moment that was very badly water marked, busted nose and had a big delam section the size of a bread plate on the deck. Once i had her water tight it looked like a patch-work quilt - so decided to repaint the whole thing. I'll post pics when I am done.
Super cool story mate ![]()
If it was me I would get someone with amazing resto skills like yoshi from takeda surfboards to bring it back to New...yoshi is a true master and can fix anything
When you start shaping uiur weapon please keep us up to date with how it's progressing ![]()
Edit...i would do what gpa suggested after looking at the pics again and the emotion that I have with my man crush had blinded me into a cosmic thought some ![]()
Select to expand quoteGPA said..
G'day mister...
Me personally, I would get it water tight and flush as possible without adding a tonne of resin and matting to it. This will be controversial to some, but given the state of the board I would be looking to repaint it - but keeping the same colour schemes... to my mind the board is 95% original shape and construction - you have only changed the colours and by replicating the original design and colour scheme you have been faithful to the original designer.
I am restoring a 1968 board at the moment that was very badly water marked, busted nose and had a big delam section the size of a bread plate on the deck. Once i had her water tight it looked like a patch-work quilt - so decided to repaint the whole thing. I'll post pics when I am done.
Thanks guys. GPA, I saw your post which gave me the idea to post this one up also!!
When you say to get it water tight, do you mean to cut all the bad bits out and re-glass them then re-paint the whole board?
I'm guessing I need to sand the entire board right back, fix the problem areas then paint. Will I be re glassing the whole board again?
Chrispy, thanks for the input. It seems s though this repair/repaint may be the go then.
My mum seems to think the stripes on this board were done by someone else as John didn't put graphics on his boards apart from his own label which I have managed to recreate also.
Also, do you guys think the fin can be sanded out to straighten the edges and will it need re-glassing too?
As for my build project, I've started an instagram page @geelongboards to post the build pics, but when I'm finished, I will probably create a section on my own website with the build in bigger, better pics too.
My dad has just sent me this pic of John and a couple of his pieces from the early 60's...

Select to expand quotemisterbrettc said..GPA said..
G'day mister...
Me personally, I would get it water tight and flush as possible without adding a tonne of resin and matting to it. This will be controversial to some, but given the state of the board I would be looking to repaint it - but keeping the same colour schemes... to my mind the board is 95% original shape and construction - you have only changed the colours and by replicating the original design and colour scheme you have been faithful to the original designer.
Thanks guys. GPA, I saw your post which gave me the idea to post this one up also!!
When you say to get it water tight, do you mean to cut all the bad bits out and re-glass them then re-paint the whole board?
I'm guessing I need to sand the entire board right back, fix the problem areas then paint. Will I be re glassing the whole board again?
The way I would approach it is to give the whole board a sand - take off the gloss coat until you just see the texture of the fibreglass matting. Cut out all the loose stuff and bad repairs back to solid fibreglass (don't freak out when a 1 inch ding ends up being 4 inches across - you have to get the rot out) and fix with two layers of fibreglass and some q-cell & resin. Once all the big repairs are done I would brush the whole board with a light slurry mix of q-cell and resin. This will seal any fractures that you have missed and fill in some of the minor dents. Sand back using 400 grit, then 600 grit - you do not need to do the 800 and 1200 grit if you are painting it. With my resto I chose to try and take out as many of the dings on the bottom as I could. Mostly I just used a thicker q-cell & resin mix so it wouldn't run everywhere. I found that the sanding blocks were better to use than a hand sander - I had more control and the flatness of the block helped me to get the dings flat and flush.
I also found that you cannot trust the feel of the repair in your hand - once hard, get it wet and take it out in natural light to see that you have all the bumps out and have it completely flush. Do this often, as repairs that are not quite right will show up when the board is painted - especially if you are doing a gloss finish - and it is far harder to get it right after you have painted it.
I reckon you should add some fibreglass to the edges of that fin before you fix the edges. There's a few good sized chips in it and it'll loose it's shape and trim if you try and take it back to good fibreglass.
A word of caution - I have had some problems painting mine. Mostly my own impatience and re-coating too soon, but also I made the mistake of using cheap paint. With the colder weather this was not hardening properly between coats. So I ended up having to leave it for a couple of weeks to harden then had to sand most of it back. I am now in the process of re-doing it with Dulux duramax high performance enamel - but leaving it a full 24hrs+ between coats. Also - do not put it in the sun to harden quicker, as it seems that if there is any tiny fractures in the board once the board gets warm it will push air out and you will get tiny tiny bubbles come through and spoil the finish (well that's my theory).
Good luck - I'll also be keen to see progress photos.
Thanks so much GPA. Once I decipher what half those items are that you hav mentioned via Google Translate ;) I think I will get to work on this project before I do the build of the other board.
With the larger delaminated bits, I've seen some Youtube videos where the guys were using the Dremel to remove those bits....Is this what I should be doing at this stage also?
I'd patch it and leave it as an heirloom. Actually probably wouldn't even do that, I'd just Clean it, polish it and hang it. The life it has lived and dents it has all have a story of their own they add character.
It has historical and centimental value.
Doesn't really look surf able. Looks twisted in the photo which you can't fix. And will make it surf like a real dog.. so my opinion. Is to just Clean it up and hang it as a tribute, repairing it to much or painting it detracts from your grandads work.
If you're going to go the whole hog and restore it take it to a pro.
You're welcome. q-cell is a micro powder filler that you add to resin to thicken it. It's very light so it does not add too much weight, also easy to sand. It does however turn the resin a very pale light/white blue - so it will stand out on the old brown board.
I just (carefully) used a Stanley trimmer to cut out the delam sections. Once you pierce the glass just run it around in a circle at 45 degrees.
Appreciate what SP is saying above - but it would be cool if you could get it in the water for a surf. If it surfs like a pig then it's a wall-hanger.
For what it is worth - I have only spent about $150 on my resto - resin, hardener, q-cell, fibreglass, brushes, sand-paper & sanding blocks, masking tape, paint and acetone for clean-up. I used a 1lt (1kg) tin of resin - looks like you will need more than that. Buy good sand-paper and masking tape for clean edges when painting. Use the cheap stuff for masking off.
Here's a pic of the bottom of the board once patched, and one of the base coat of paint. I know which one I'd rather hang in the games room (with the resto story to tell).
FYI - I have followed the bottom colour around the rails to the lap line on the deck. Inside that will be a paler blue, with a 3mm black pin-stripe between. I am leaving the fin in the original resin green. Would have it finished by now if I had started in Summer - but only found the board in April.


Thanks guys.
SP - I hear ya. Granted I'm no expert but the board is surprisingly straight. I think the photos may be deceptive and there's a few high spots where the glass has bubbled up.
GPA - I have to say I'm really keen on getting this one in the water.
I will start gathering the gear I need and get to work shortly :)
I agree with SP & GPA in what they say, really good info..yes the tail looks twisted in the rear and near, but not, impossible to get straight...but certainly worth a resto.
Nice work on your pin tail GPA..though I prefer the life led shown myself...one of mine.

Select to expand quotesurfbroker said..
..yes the tail looks twisted in the rear and near, but not, impossible to get straight...but certainly worth a resto.
The photo I used is a bit deceiving. The tail is cut on an angle and the blanket under it has made it look twisted but apart from the obvious damage, the board is straight. which is a relief.
Hi all,
bit of a technical question, what ratio do you mix the Q cells and resin,how far can you stretch it?Also is that the same ratios when using epoxy.
Have bought a few boards back from the dead but have always winged it a bit on the materials and how I use them.![]()
Cheers
Volume wise I have gone around 1 / 1 until it's a bit like sloppy toothpaste - but you have to increase the amount of catalyst to get it to set. Always worth doing a small test batch first.
A further question for the breezes brains trust.
How are you repairing delaminations, particularly smaller areas. In the past,trying to cut through lifted glass and sanding, relatively small areas soon balloon out.
I'm in the middle of repairing an Alf Jeffries shaped Cordingley twin fin. There is an area of delaminated glass on the bottom, that has radiated out from one of the transfers under the glass. In an effort to try and retain the transfer and hopefully simplify the repair, I have injeceted a epoxy and Qcell mix under the lifted glass, through a series of 4mm holes , screeded the filler, covered with plastic film and left it set with some weight on top. I'll sand it back then glass.
Thoughts and experiences?
Select to expand quoteSRrat said..
A further question for the breezes brains trust.
How are you repairing delaminations, particularly smaller areas. In the past,trying to cut through lifted glass and sanding, relatively small areas soon balloon out.
I'm in the middle of repairing an Alf Jeffries shaped Cordingley twin fin. There is an area of delaminated glass on the bottom, that has radiated out from one of the transfers under the glass. In an effort to try and retain the transfer and hopefully simplify the repair, I have injeceted a epoxy and Qcell mix under the lifted glass, through a series of 4mm holes , screeded the filler, covered with plastic film and left it set with some weight on top. I'll sand it back then glass.
Thoughts and experiences?
That method will work fine,good to see one of Alfys coming alive again.Would it be a stinger twin?
Hi folks. Well that glass removal went a LOT easier than expected. It al lifted off quite easily.
Next question for you all....
The nose - I feel I should cut it square and re-build it?
The tail - What do I do with all that glass around the fin? Sand it right down then glass over it later? I'm guessing it is glued to the stringer by the looks of things.
My next move is to get the Q-Cell product to fill the low spots after I sand back the sunburnt foam?
I hope I'm going about this all correctly ;)


Select to expand quotewavemaniac said..SRrat said..
A further question for the breezes brains trust.
How are you repairing delaminations, particularly smaller areas. In the past,trying to cut through lifted glass and sanding, relatively small areas soon balloon out.
I'm in the middle of repairing an Alf Jeffries shaped Cordingley twin fin. There is an area of delaminated glass on the bottom, that has radiated out from one of the transfers under the glass. In an effort to try and retain the transfer and hopefully simplify the repair, I have injeceted a epoxy and Qcell mix under the lifted glass, through a series of 4mm holes , screeded the filler, covered with plastic film and left it set with some weight on top. I'll sand it back then glass.
Thoughts and experiences?
That method will work fine,good to see one of Alfys coming alive again.Would it be a stinger twin?
5'10" Single flyer swallow tail, plan shape like alot of modern interpretations of a fish. Pretty thick but with quite a low rail. It rides unreal, good bit of paddle, fast, loose enough and really forgiving. It's a mates board and it was his go to board for years. It has two completely different fins and a lot of repairs but goes like the clappers!
Plan is to fix a new crack, make good the delaminated bits ( so far so good), tidy up the fins , make sure everything is water tight and go surfing.
I have a 6'0" PE double flyer swallow twinny to do up too. It's got the lot, dooby holding flutes that run out through the double flyers and really subtle step tail that forms a shallow pin tail before the swallow.
"It's a trip man"
I'll endeavor to get some picks up
SCored this old emerald few nights ago . Really just want to get it back in the water but would love to save the emerald logo on the nose . Fair bit of water rot under it . Wondering what you blokes think - cut off the logo and rebuild with q-cell then fibreglass logo back on ?


That's a good effort mrbrett - here is one I had rebuilt with a professional board restorer - hope these pics help - it's amazing what the experts can do with an old board


Theres a shop down in Bangalow NSW called Drift. it sells clothing and merchandised with the owns collection of really cool boards.
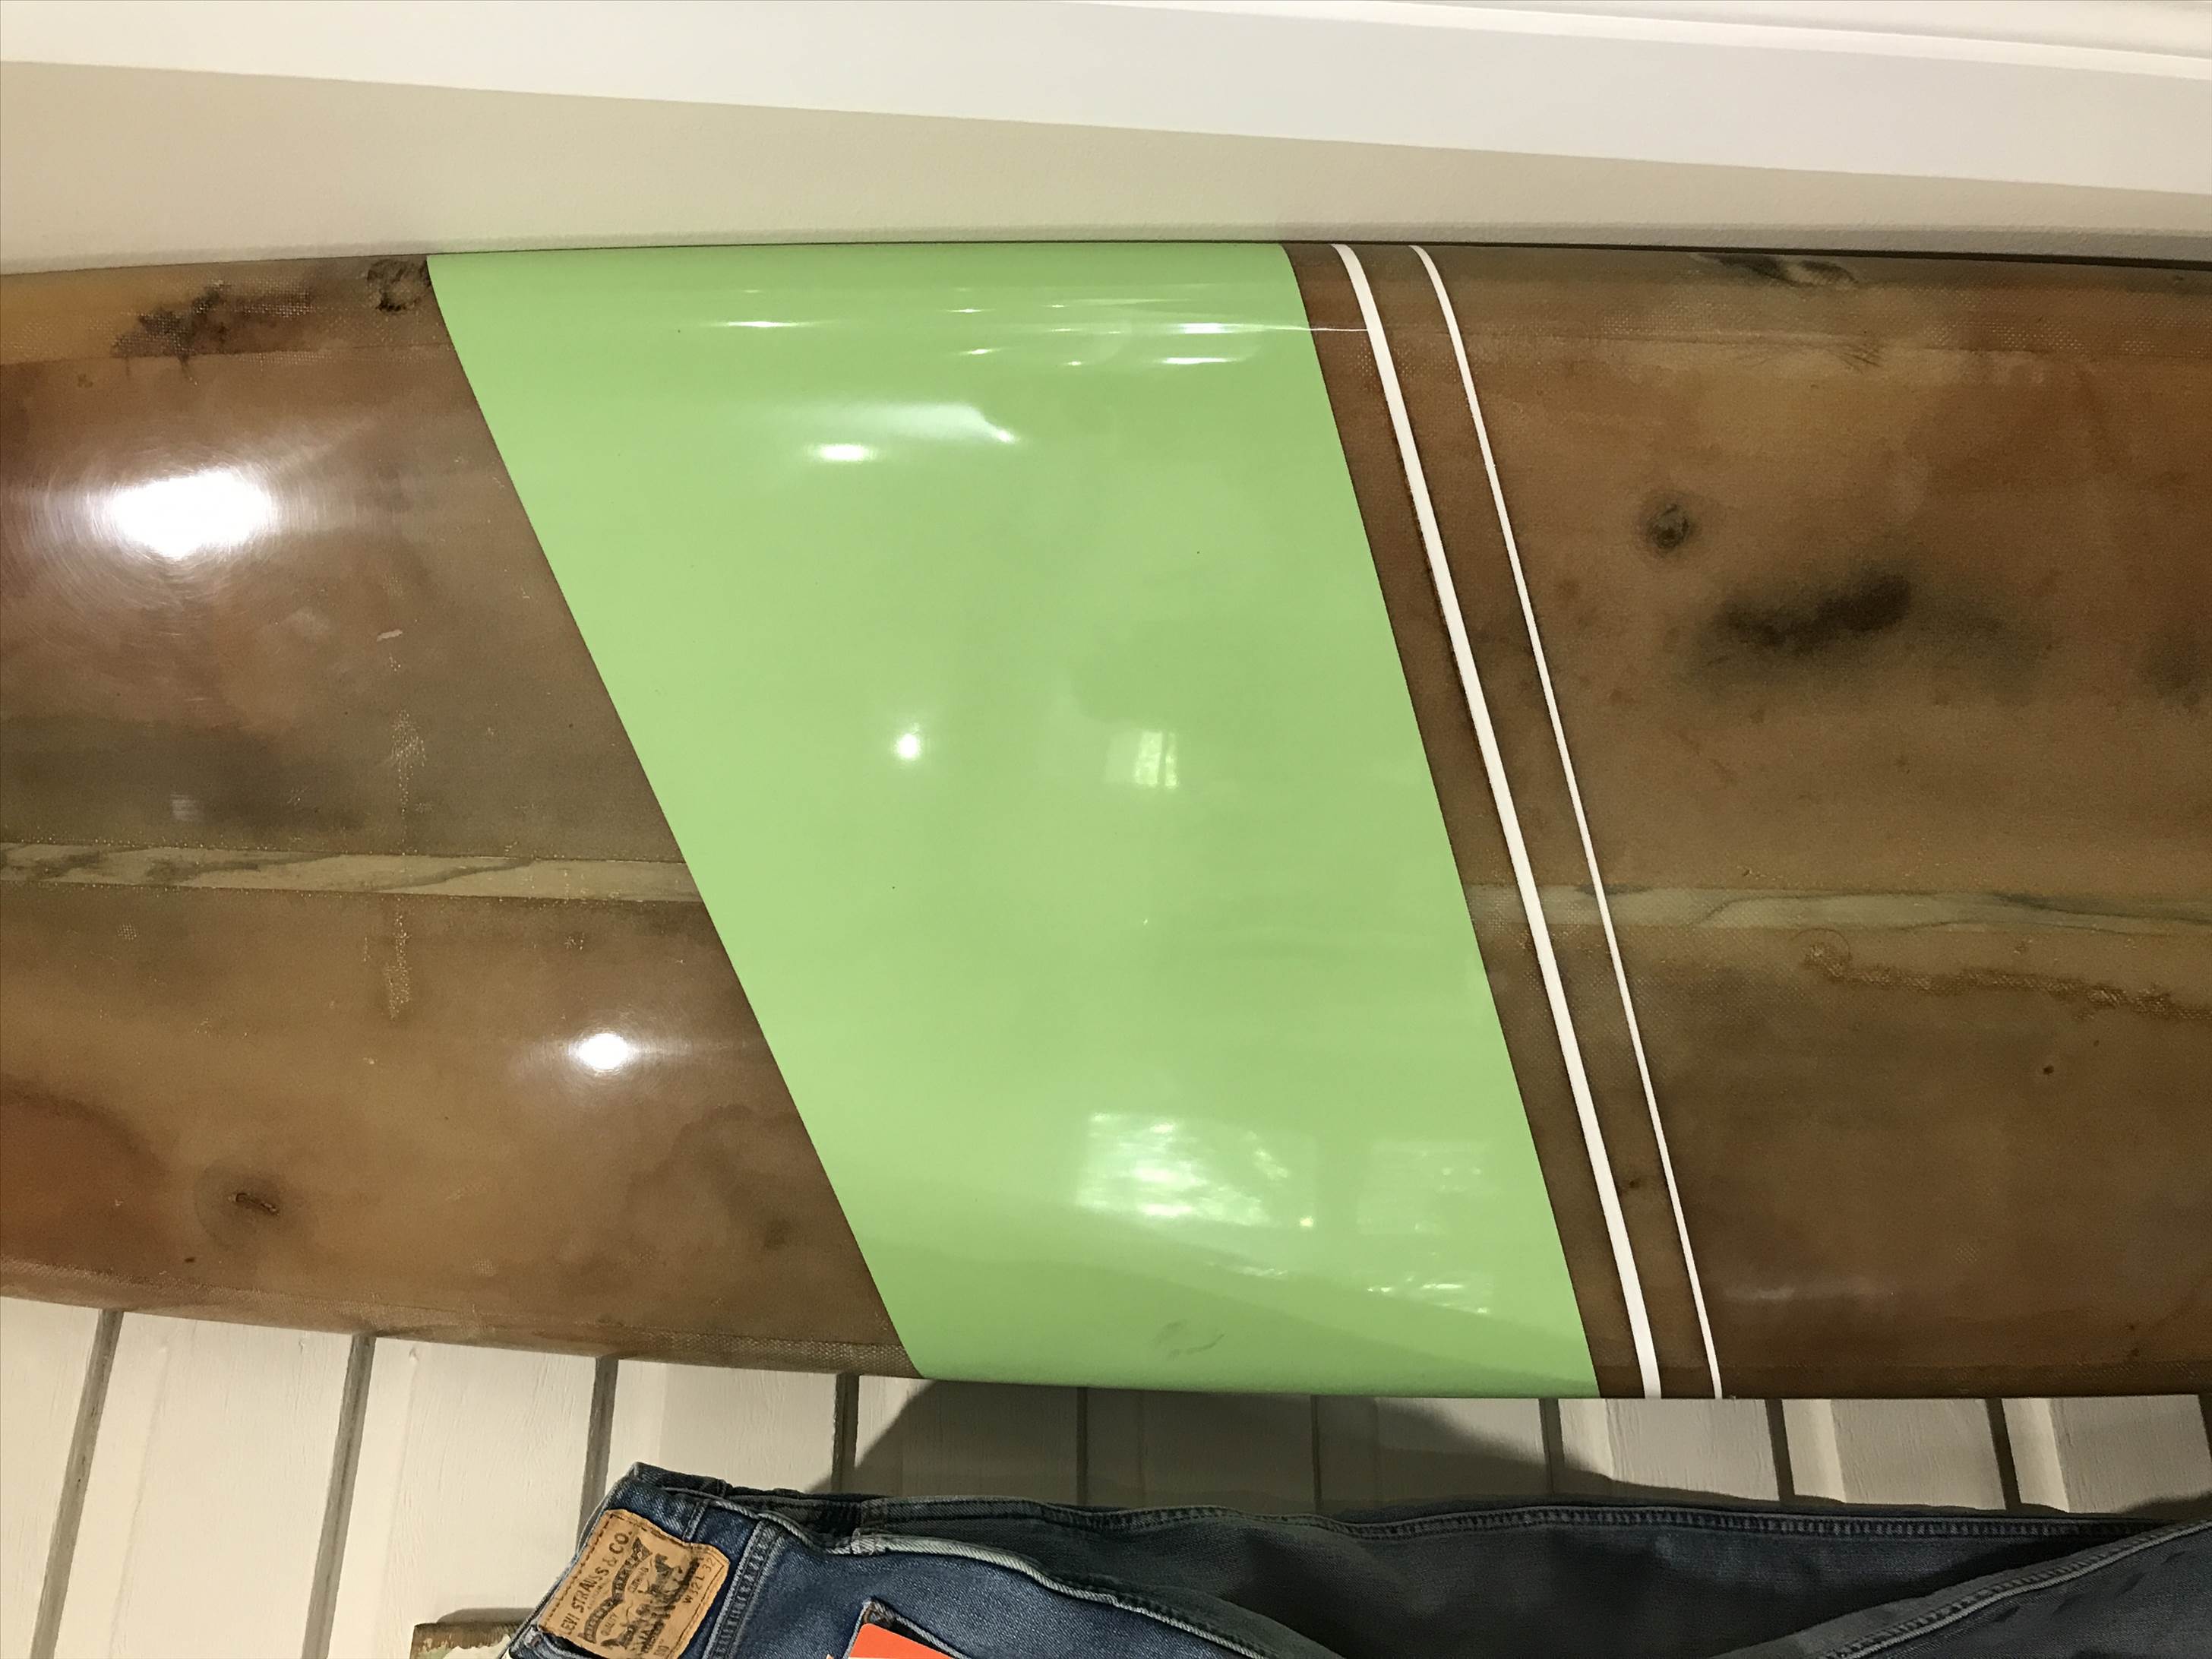
Personal I love this look, the burnt sun damaged blanks with fillers in the low points made this board,it almost looked like timber grain ,they then added the panels on the filler coat to finish off and make it pop.You could do this on the tail and nose were you need to cut out the rot and add new foam.

Select to expand quoteTassiedevel said..
SCored this old emerald few nights ago . Really just want to get it back in the water but would love to save the emerald logo on the nose . Fair bit of water rot under it . Wondering what you blokes think - cut off the logo and rebuild with q-cell then fibreglass logo back on ?
I have renovated a few custom SIC paddleboards.
Generally the logos and stickers are either shot from the sun, or beaten up by the paddle.
I have photographed logos, got my graphic designer daughter to turn them in to Adobe files, and got a sign writer to re make the stickers.
They can print anything so long as you have a digital version, and if you don't have a graphic designer daughter I'm sure most signwriters could use an image of the old logo to re make.
My latest..
From this....


To this.
Decided on a change of logo colour too.


Waiting on some 1/4 inch pin stripe to finish off.
You could try emerald, they are still around and might be able to send you a logo. Or rhema graphics do a lot of board logos and might be able to help.
That's a really good job on the other one. Looks good.
Select to expand quoteMacaha said..
Theres a shop down in Bangalow NSW called Drift. it sells clothing and merchandised with the owns collection of really cool boards.
Personal I love this look, the burnt sun damaged blanks with fillers in the low points made this board,it almost looked like timber grain ,they then added the panels on the filler coat to finish off and make it pop.You could do this on the tail and nose were you need to cut out the rot and add new foam.
Love the used look Mac . Was told a while ago every ding on the board tells a story .This is an old kneeboard I have .Have tried to surf it but it sits about 6 inches under the water with me on top of it . They reckon to surf the old spoons you had to be super fit - I am not .


Thanks Nozza - have a bloke does sign panting for us at work - never thought of that .
Select to expand quoteSP said..
You could try emerald, they are still around and might be able to send you a logo. Or rhema graphics do a lot of board logos and might be able to help.
That's a really good job on the other one. Looks good.
Didn't realise Emerald were still around - will chase them up tomorrow .Really happy with the restored Darby -unbelievable job was done up at Buckos surfboard repairs . Was my board as a teenager .


